OpenERP AT A GLANCE :-
- OpenERP (previously known as TinyERP) is a comprehensive suit of business applications similar to SAP and Microsoft Dynamics for small and medium enterprises. It is completely cutomizable,platform-independent and an open-source system completely developed using open-source technologies like Python, Postgresql and pyGTK. It follows a modular approach called Model-View-Controler. It is developed by Belgium based software development firm called OpenERP SA. Most of it's code is released under AGPL license so there is no fees involved in use of the software. OpenERP follows a modular approach as described below.
- What Is Module ?
Module is an independent and self-contained unit of any system. OpenERP modules are written in Python. The usage of module in OpenERP will extend the functionality of OpenERP. It uses OpenERP ORM to persist it’s data in a relational database called Postgresql. Modules are simple way to structure a complex application. One can add his own module in his OpenERP system or customize any existing module. Modules could also be known as plug-ins. Our demo module is called Student_info. This module provides an interface to collect following information about students.
- Name
- Age
- Gender
- Percentage
- Details
- Active
It also displays list of student information in tabular format. You can search student by name, gender and age.
Following are the standard Applications available in OpenERP.
- CRM
- Sales and Distribution
- Accounting
- Marketing
- Human Resource
- Purchase
- Manufacturing
- Project Management
- Point of Sale
- Warehouse Management
- Invoicing
- Payroll
Apart from modules given above, there are around 700+ modules available for use.
- Following are steps to install module in OpenERP :
For sake of simplicity here we will use module name “Student_info”
- Copy your module directory into addons directory located under your Openerp directory
- Launch an OpenERP server using following command:
python openerp-server.py --addons=<path of your addons directory>
Here in above command openerp-server.py file is located at <your-openerp- directory>/server/bin/ directory. You also have to supply path of addons directory which is generally located right under your openerp directory.
If you see the message like “OpenERP server is running, waiting for connections...”. you have successfully started the server, Bingo!
- After starting server, start your either GTK client using following command:
python openerp-client.py
Here in above command openerp-client.py is located at <your-openerp- directory>/client/bin/ directory. After launching the client successfully you will see following screen.

Our database is test_demo but you have to select your own database.
Enter correct username and password and click on OK button.
- After clicking on button you will see following screen. Here you will see“Administration” menu item. Click on it.

- After selecting Administration module expand “Module” items.

3 Select “Update Modules List”. As your module is not a part of the certified addons yet, you will need to update the repository which is identified by the OpenERP Server.

- Now you can see one wizard “Update Module List”. Click on “Update”. This process will update modules

- After updating module you need to add new module as well as updated module. So after updating modules one wizard will open as “Update Module List”. Click on “Open Modules”.

- Now you can see all modules are loaded in the module list.
7. You can search any module by Name, Description, Dependencies or State. Here


- Now you can see the filtered results containing name “student” which is showing “Not installed”. Just click “Student_info” and go to Form View or just double click on that.

- Now you can see all the information about Student_info containing Name, Quality Certificate, Category, Information about Author and Dependencies. For installing “Student_info” click on “Schedule for Installation”.

- For applying updates click on “Apply scheduled Upgrades”.

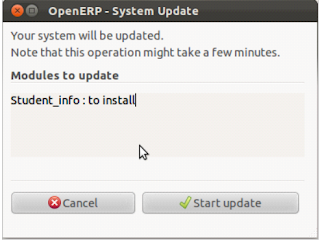
- Now one wizard will open to start update “Student_info”. Click on “Start update”.
- Now next step is to start configuration after updating module. Click “Start configuration”.

- Click ctrl+R to reload the Modules. Now you can see the “Student” Module is loaded in Menu. Click on that.
14.Now expand the tree of Student Management. Click on “Student Information”.
15. After Clicking Student Information you can see the List View in which all the fields of Student will be shown and records of which are shown in list .


- You can create a New record by clicking “New”.

- After clicking new record you will take to another wizard i.e. a Form View in which u can edit, create a new record and save it.

- After clicking that you can see that Document is saved and it is showing in centre bottom that “Document Saved”.

- Now you can search any record by its Name, Gender or Age. Here we have searched a “abc” name and it is showing record name containing student name “abc”.

- Another example of search, we have searched by “Gender” and we can see record containing Gender “Female”.

Module structure of OpenERP module :

Module structure considers the following things :

1. OpenERP addons (openobject-addons) OpenERP business modules :
OpenERP addons host the functional business modules of openerp covering: accounting, sales, crm, purchases, warehouse, manufacturing, project, human resources, marketing, knowledge, point-of-sale, and much more.
Addons contain the list of modules.
The modules :
When you create any module there are minimum four files required. which are given below :
   1. __init__.py

    2. __openerp__.py

   3. filename.py (Your model file )

   4. filename_view.xml :
ViewsActionsMenu entriesReportWizard
Now we shall see how to create a module in OpenERP:
Step 1: Create the __init__.py file in the new folder you have created for the module, in the addons directory. The __init__.py file must have a line to import the main python(.py) file you intend create for the module.Having the __init__.py file in your
module makes the code a package.
Step 2: Create a module description file (i.e __openerp__.py). The __openerp__.py file provides a description of the module you want to create. It essentially contains a python dictionary.
         Step 3:  Create your python file that contains objects (Infact thats your model) .
                 This file you have to import in your __init__.py file.

    Step 4 :  Create your view.xml file
This XML file is a VIEW component of MVC architecture, which is responsible for the GUI.
They are used for many purpose :
- Initialization and demonstration data declaration.
2. Views declaration :
Views are a way to represent the objects on the client-side.They indicate to the client how to layout the data coming from the objects on the screen.There are two basic types of view(there are more, but let's focus on basic ones):
Form viewTree viewList view is simply a particular case of tree view.
3. Report declaration :
OpenERP uses a flexible and powerful reporting system.Reports are generated either in PDF or HTML format.Reports are designed on the principle of separation between the data layer and presentation layer.
4. Wizard declaration : A wizard is declared using wizard tag.
5. Workflow declaration.
The workflow describes these interaction with graphs.One or several workflows may be associated with the objects.Workflows are not mendatory.
Screen short of the module is given below :

In above figure you can see the list of modules in the addons.
The four file described above are :
(1)__init__.py
(2)__openerp__.py
(3)Student_info.py
(4)Student_info_view.xml
Now we see content of these above file:
(1)__init_.py
This file contains the import statements for importing python(.py) files.
The screenshot of this file is shown below.

(2) __openerp__.py
This file contains the directory which gives introduction about module. In which there are various field described below.
Key | Value |
name | It shows field contains the name of the module. |
version | It shows the version of the module. |
author | It shows author of the module. |
website | It contains website of the author. |
depends | It is a list of modules on which this module depends. |
category | It shows the category of the module (i.e. sales,finance,etc.) |
description | The detailed description about the module which describe the functionality of the module. |
init_xml | It contains list of xml files which will get executed when the module gets installed. |
update_xml | It contains list of xml files which will get executed when the module goes under update mode. |
demo_xml | It is a file same as other xml files, but this one contains the demostration data of the models created in the module. |
active | It describes that if this module is installed by default or not. |
installable | It describes this module is installable or not. |
certificate | The certificate no. Assigned by Editor, OpenERP SA. |
The example of the __openerp__.py file is shown in the screenshot below.

(3)Student_info.py
It contains the class which is inherits osv class by importing osv and fields class from osv file. The class contains _name which contains name of table, _columns which contains fields of table and _defaults is to give default value.
- _name:
It define the table name of module. If (.) is used then it will be replaced by (_) in table name.
- _columns:
It contains fields of the table. Fields contains various data type which shown below.
Data type | Description |
char | It stores character data. Size is necessary for this data type. |
integer | It stores the Integer value. |
boolean | It store Boolean value which contains True or False. |
text | It stores large amount of character data without defining the size. |
float | It stores the floating(decimal) value. |
selection | It contains list of tuple to store data in list. Can be said as a combo-box. |
The _columns field contains dictionary to store fields of table.

In above screenshot the _columns contains dictionary which contains various keys and values. Key describe fields of table and value describe data type, label name and constraints of the field.
Various constraints are shown below.
Constraint | Description |
required | It is used for mandatory field. If value of required is True then it consider as mandatory field. |
readonly | If value of read only is True then user can not modify in field. |
translate | If value of translate is True then the field can be translated into installed language. |
- _defaults:
It is use for give default value in table's field. The example shown in below screenshot.

The _defaults variable contains the dictionary, in above screenshot the name field contains default value “Atul” and it is Active.
The student_student() calls the parent class osv.osv's constructor.
View the XML File
There are two type of architectures
A. Client-Server Architecture
B. MVC Architecture
As per MVC architecture there are Model,View, and Controller. So this is view of
the system.
For the view of the module a file is created which is formatted as XML.
There are three categories of XML file in module.
1) View
- Search View
- Tree View
- Form View
This portion contains presentation of your module. As per the requirement,
there are three types of view.
- Search View:
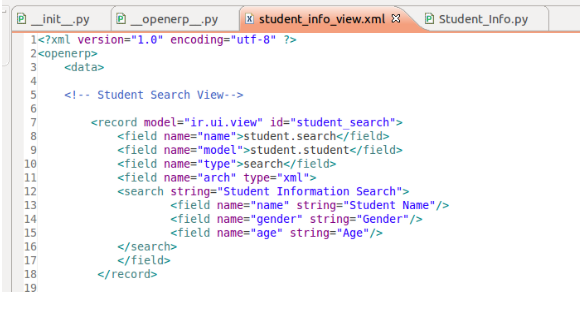
Search View used in module to provide the search panels in form , and from those fields user can search the data. It creates a customized search panel, and is declared quite similarly to a form view, except that the view type and root element change to search instead of form.
Here, in above example Name, Gender and Age fields are provided so by using these fields user can search the particular record.
- Tree view

Tree view is also called a list view. We can specify columns which we want to add in the list with some details of list display.
In above example we can see the Student Name, Student Age, Student Percentage , Gender and Active Status.
- Form view

Form view is used when the User wants to Edit or Add the information. The field disposition in a form view always follows the same principle.By default, each field is preceded by a label, with its name. In above example code displays the form view of module and fields like name,age,gender etc.
2) Action :

The action defines the behavior of the system in response to the action of the users. Action portion shows an action or behaviour of module. It shows the priority of the views. By this action we will open next view.
In above code you can see that when we open the module the default view of module is form view.
3) Menu :
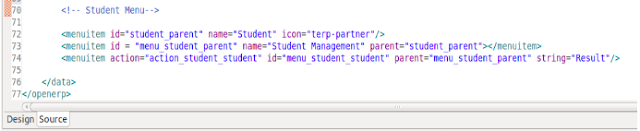
In OpenERP, this element represents a menu structure as shown in the screenshot. You would be able to reach the Forms of the model only by clicking on this menu and it will trigger an action you created in (2).
We hope this guide will help you sail well in the boat of learning OpenERP Module Development.
Wish you a good luck for your module.
Thanks,
Malhar Vora, Bipin Rathod, Vijay Rathod, Nishant Jogi, Kalpana Hemnani, Abhishek Mehta, Atul Makwana, Hitesh Panara.
Guided by: